| |
![]()
2 Developing Java-based Applets for MapleNet
In this Chapter
Important Note to Previous MapleNet Users: prior to MapleNet, Release 2.0, your applets used the Java package com.maplesoft.client.*, for example, class com.maplesoft.client.MapleStatement. Due to the repackaging of Java classes within all Maplesoft products, the classes in com.maplesoft.client.* are now found in the package com.maplesoft.maplenet.client.* The imports in your existing applets must be changed and recompiled to work in MapleNet, Release 2.5 and higher.2.1 Writing Java-based Applets
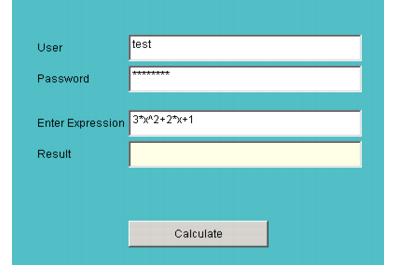
The following Sample Integration Applet (Figure 1) requires a user to enter a username, password, and expression. By clicking the Calculate button, a request is sent to the MapleNet server to integrate the expression. The result is displayed in the Result textbox. This applet illustrates how requests are passed to the MapleNet server. The input (Enter Expression textbox) and output (Result textbox) are text-based Maple syntax.
Figure 1: Sample Integration AppletPassing Requests to MapleNet
The Sample Integration Applet Code (Listing 1) provides the section of code that performs the connection with MapleNet. In this example, the computer name is derived from the web page that contains the applet during the initialization phase of the applet, which is stored in the host string variable. The code for this example is in the source file integration.java, which is available in the Publisher/samples folder created during installation.
Sequence of Events
When the user clicks the Calculate button on the Sample Integration Applet (Figure 1), the do_calc() routine is invoked with the following sequence of events:
Maple Notes
2.2 Compiling Java Code
Compiling the applet code with a Java compiler produces an integration.class file. This class file contains the executable code for the applet. To use the executable code, create an HTML page that references the class as an applet.
The mnc-maplenet.jar file must be included in the classpath argument of the compiler. For a complete list of necessary JAR files, see the Appendix. Listing 2 illustrates how to compile a Java class named integration.java.
Listing 2 Compiling integration.javaThe following examples would be typed into a DOS or console window.
On Windows:
 javac -classpath \path\to\mnc-maplenet.jar integration.java


 Note: 1) the above command is typed as a single line.

       2) Replace \path\to with the actual path to the file mnc-maplenet.jar
On other platforms (Macintosh, Linux, and UNIX):
  javac -classpath /path/to/mnc-maplenet.jar integration.java


 Note: 1) the above command is typed as a single line.

       2) Replace /path/to with the actual path to the file mnc-maplenet.jar
Notes:
1. The Java SDK bin directory is required to be included in the PATH environment variable. Otherwise use the complete path to the javac program.2. Ensure that you use the correct file path specification for the mnc-maplenet.jar file so that the javac program can locate it.3. The path separator character is a semi-colon (;) in Windows and a colon (:) on other platforms.Important note to previous MapleNet users: In earlier versions, all MapleNet client code was packaged in a single JAR file (maplenetclient.jar). In MapleNet 10, the code is separated into several JAR files to improve download efficiency. To be compatible with MapleNet 10, your existing code must be recompiled with these new JAR files.2.3 Creating a JAR File
Use the following command to create a JAR file, for example, myapplet.jar, that contains the required class files. This example assumes the class files are in the current directory.
jar -cf myapplet.jar *.classwhere myapplet.jar is the name of the JAR file being created and *Class is used to include all class files in the present directory.
For some classes in the API to be executed (PlotComponent, mathmlEquation and mathmlEditEquation), the application JAR file must be signed for appropriate permissions on the client machine. For complete instructions on how to sign a JAR file, refer to http://download.oracle.com/javase/tutorial/security/toolsign/index.html.
Once this JAR file is created (and signed, if necessary), specify it in the .html file, as shown in the following section.
2.4 Creating an HTML Page
Before you can publish to the MapleNet server, you must create an HTML page that references the compiled Java code (the Class file) as an applet.
The following Integration.html sample code (Listing 3) illustrates how to build a page for Microsoft® Internet Explorer® and Mozilla® browsers.
Note: Java applets that require a Java version greater than 1.1 must use the Java Plugin. Use the <object> tag in Internet Explorer and the <embed> tag in Mozilla browsers (e.g., Firefox®). For a complete discussion of setting up web pages for simultaneous Internet Explorer and Firefox support, refer to http://download.oracle.com/javase/1.5.0/docs/guide/plugin/developer_guide/using_tags.html.Listing 3 Integration.html<html> <head> <title>Integration Example</title> </head> <body> <center> <H2>Integration Applet will appear below in a Java-enabled browser</H2> <object classid="clsid:8AD9C840-044E-11D1-B3E9-00805F499D93" width="400" height="300" align="middle" > <param name="type" value="application/x-java-applet;version=1.6" /> <param name="CODEBASE" value = "./" /> <param name="CODE" value = "integration.class" /> <param name="NAME" value = "IntegrationApplet" /> <param name="ARCHIVE" value = "myapplet.jar,/maplenet/jar/mnc-index.jar" /> <param name="expression" value="3*x^2 + 2*x +1" /> <comment> <embed type="application/x-java-applet;version=1.6" width="400" height="300" align="middle" code="integration.class" codebase="./" archive= "myapplet.jar,/maplenet/jar/mnc-index.jar" expression="3*x^2 + 2*x +1"> <noembed></comment> Error Java 1.6 not supported</noembed> </embed> </object> </center> </body> </html>Note: the relative path to mnc-index.jar must be specified. Ensure that all mnc-*Jar files listed in the Appendix are in the same directory as mnc-index.jar.
If you choose to use an applet tag in your web site, the parameters must be specified as shown in Listing 4.
Listing 4 Applet Parameter Syntax<applet width="400" height="300" align="middle code=" integration.class " codebase="./" archive=" myapplet.jar, /maplenet/jar/mnc-index.jar" > <param name=" expression " value="3*x^2 + 2*x +1"/> </applet>Specifying Parameters
In the .html file, specify the parameters listed in Table 1.
Notes on Host, Port, and Codebase
The host and port can be set via several different mechanisms. You can explicitly set the host and port using the constructor
MapleStatment( String host, int port, String user, String password )
With this method, if you move the application to another server, your application will be responsible for determining the new host name and/or port number. An alternative is to use the constructor
MapleStatment( Applet applet )
so that the connection information is determined from the URL of the web page that displays the applet. Therefore, if the web page is moved to another server, the application will automatically use the new server with no changes.
A third alternative is to specify the host but set the port to -1 with the constructor
MapleStatment( String host, int port, String user, String password )
In this instance, the code will try to load the maplenetConfig.properties file from the classpath. In the case of applets, the classpath is set by the codebase parameter. The installer creates the file
/maplenet/jar/maplenetConfig.properties
with the required port settings. If you point your codebase to the directory ".", the directory containing your applet and web page, your application will not find the maplenetConfig.properties configuration file. You would need to copy the config file to the directory that corresponds to ".".For this example, integration.java, you can add optional input parameters in the Java source code, as listed in Table 2.
Loading the Web Page
When the web page loads, it runs the applet specified by the code parameter. This code accesses the MapleNet server using the classes indexed in the mnc-index.jar file. This file and all other files listed in the Appendix must be accessible to the web browser.
Once the applet is compiled and the web page is created, publish the associated files (.html, .java, and .jar) to the MapleNet server.
2.5 Publishing Applets to the MapleNet Server
Publishing a Java applet to the MapleNet server requires copying the applet JAR file and its associated HTML page to the appropriate directory on the server. The files can be copied to the server using any network file transfer tool, such as FTP, SSH, or WebDAV.
Consult your site administrator for specific details on where your files should be placed and what method should be used to transfer them.
Once the files are copied to the server, your content will be available by accessing the appropriate URL. Using the example developed in Section 2.4 with the files
myapplet.jar
Integration.html
then assuming the MapleNet server is myserver.com, and that your files were transferred to the applets directory of the MapleNet web application, the applet can be accessed by pointing your browser to http://myserver.com/maplenet/applets/Integration.html.
Consult your site administrator for the exact URL to access your content.
| |